1. Constructing an Object
2. Saving the File
3. Print Approval & Completion
4. Cost of a Print
Constructing an Object
You can 3d print any 3d solid created in a variety of softwares. No matter the software, your object will only print flawlessly if it is a closed polysurface. In Rhino, the first line in the tab “Properties” will tell you the type of object. This must say closed polysurface or closed extrusion.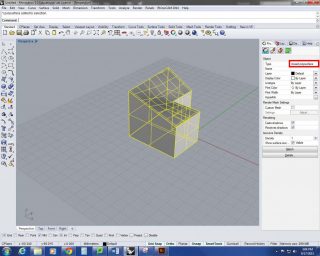 Using the solid tools in Rhino is the easiest way to construct this kind of object.
If you are using surface and line tools, make sure to turn on Osnap, without which it will be nearly impossible to create a closed object. After making surfaces with shared edges, you will need to join these surfaces. This will make your object either a closed polysurface or an open polysurface(s).
CapPlanarHoles is a command you can use to fill in a surface that might have been missed when constructing the solid. If this doesn’t fix the problem use the ShowEdges command and select “Naked Edges” in the Edge Analysis window that comes up. This will highlight the areas that you need to close off. Any “Non-manifold” edges should be edited as well.
Intersecting closed polysurfaces will create a negative in MakerBot. Make sure to BooleanUnion multiple polysurfaces into one object.
At this point you should hide your object by clicking on only the object not dragging a selection box over it. Any left-overs (lines, surfaces, solids) should be deleted. You don’t want any extra information in your object, only the profile edges of your solid. Any extra surfaces or solids may create a void which shoots out of the model in unwanted ways.
Use the AnalyzeDirection command to make sure that all surfaces are facing “out”. Any surface which is inside out will result in a very confused .thing file.
When creating solids and polysurfaces, be sure to Join surfaces and BooleanUnion solids. Do not Group objects together.
http://wiki.mcneel.com/rhino/faqclosedsolids
http://cmu-dfab.org/rhino-surfsolid/
Saving the File
- Maker Bot
Export your model as an .obj, .stl, or .thing. This file types are slightly different so if you have a messy file it might appear differently in MakerWare as a .stl compared to an .obj. If your first file has problems, try saving and opening it in MakerWare as a different file type. Sometimes this can be a shortcut to having to go through the original model and hunt down the problems.
- UPrint
Our newest and highest quality 3d printer requires you to export your file as a .stl.
Print Approval & Completion
Before your file can be printed, designSHOP staff must review your file for any errors. After review, shop staff will fill out a print form with you containing helpful information pertaining to your print, allowing staff to give you a total cost for the print. From there the print is added into the print queue.
Completion of a print will usually take between 24 and 48 hours, sometimes longer depending on 3d print demand. Following completion of a print, it can be picked up from the designSHOP. All 3d prints are paid for in razorbucks with your student ID. To pay for the print, designSHOP staff will handle the transaction with you.
Cost of a Print
MakerBot – ABS plastic or PLA Plastic
10¢ per gram of ABS plastic
13¢ per gram of PLA plastic
Z Printer – uses zp151 powder and zb60 material
$2.00 per cubic inch of zp151 powder
20¢ per milliliter of zb60
UPrint – uses ABS plastic and dissolvable support material
$2.82 per cubic inch of ABS
$5.48 per cubic inch of dissolvable support