Laser Introduction
Laser Cutter Uses
Vector Graphics- Laser will CUT or SCORE along lines of a certain color. POWER and SPEED can be set higher or lower to Cut or to Engrave depending on the Material and its Thickness
Raster Graphics- Laser performs a printer-like function. It moves back and forth across the material while the laser ENGRAVES a surface image. The laser automatically fluctuates the POWER according the lightness and darkness of individual pixels in the image

MATERIALS
Plastic: Very toxic fumes.
Please speak with the Lab Assistant before cutting this material.
Wood: No difficulty
Edges will look burned. Proper settings can minimize the burn.
Paper: No difficulty
Edges will look burned. Proper settings can minimize the burn.
Ceramic, Glass & Metals: Only etches with special coating.
Please speak with the Lab Assistant before cutting this material.
EQUIPMENT
Computer
Adobe Illustrator (Graphics) Software
UCP (Laser) Software
VLS6.60 LASER CUTTERS 32”x18” ALVAR & BUCKY
VLS2.30 LASER CUTTER 24”x12” CHARLOTTE & DENISE
Procedure
STUDENT-USER RESPONSIBILITIES
Sign up at designreserve.uark.edu
Check drawings – Should errors be found students will be required to fix them before their job is run, this may result in the technician postponing the job.
Laser Exhaust system MUST be turned on before job is started & if you are the only person using lasers the exhaust should be turned off.
Air Assist system MUST be turned on before the job is started & if you are the only person using lasers the exhaust should be turned off.
Clean up during and after job is complete (All scraps in and around the laser & paint rooms).
Technicians will assist and ensure the job runs smoothly —they are not there to redraw your files.
FILE TYPES
2D Vector Drawing– Multiple software platforms can be used to create a 2d vector drawing. However, all files run on the laser cutter will need to be in Adobe Illustrator.
2D Raster Image– Multiple software platforms can be used to create a raster image. However, all files run on the laser cutter will need to be in Adobe Illustrator. Please have image prepared in Adobe Illustrator.
Adobe Illustrator Setup Guide
DOCUMENT SETUP
OPEN ILLUSTRATOR
(FILE>NEW or CTRL+N)
RGB COLOR MODE
(FILE>DOCUMENT COLOR MODE>RGB)
ARTBOARD
Drawing should be oriented on a 32”w x 18”h for large laser or 24”w x 12”h for small lasers

LAYERS
It would be helpful for the LaserLab staff to troubleshoot any problem with drawings using layers that you have established. Create geometry on separate “CUT”, “SCORE”, and “ETCH” layers. Click (WINDOW>LAYERS or F7)

SETTINGS - UPDATE W/IMAGES
VECTOR GRAPHICS
ONLY works for STROKE (Outline) .001pt
CUT LINES (Higher Power/Lower Speed)
STROKE: .001pt
COLOR: RGB RED (255,0,0)
FILL: NO FILL!!!
SCORE LINES (Lower Power/Higher Speed)
STROKE: .001pt
COLOR: RGB BLUE (0,0,255)
FILL: NO FILL!!!
RASTER GRAPHICS
Works with STROKE greater than .01 pt and or .jpeg image.
ETCHING (Laser Carriage travels back and forth from top down)
STROKE: ANYTHING > .01pt
COLOR: RGB BLACK (0,0,0)
FILL: ANY COLOR OTHER THAN RED OR BLUE
ADVANCED CONTROLS
Red, Black & Blue are by far the most common colors used to “Print to the Laser”.
For more complex jobs requiring multiple (more than 3) cuts, power settings can be adjusted individually for these 8 colors manually. Setup your Artwork in Illustrator according to the color values on the chart below. Please work with Lab Assistant to manually adjust laser power settings.

PRINT TO LASER
Illustrator to UCP(laser software)
DOUBLE CHECK ARTWORK
Geometry position on artboard.
Stroke size: .001pt.
Color settings & mode (RGB)
ONCE YOU ARE PRINT READY: Click (FILE>PRINT or Ctrl+P)
- Select correct Printer: VLS3.50 for PURPLE or GREEN & VLS6.60 for BLUE or RED
- Select Media Size: User-Defined LANDSCAPE
- Select Placement: Click Upper-Left corner of grid
- Click: PRINT

UCP Settings
OPEN UCP
After Printing to Illustrator, Select UCP Software
![]()
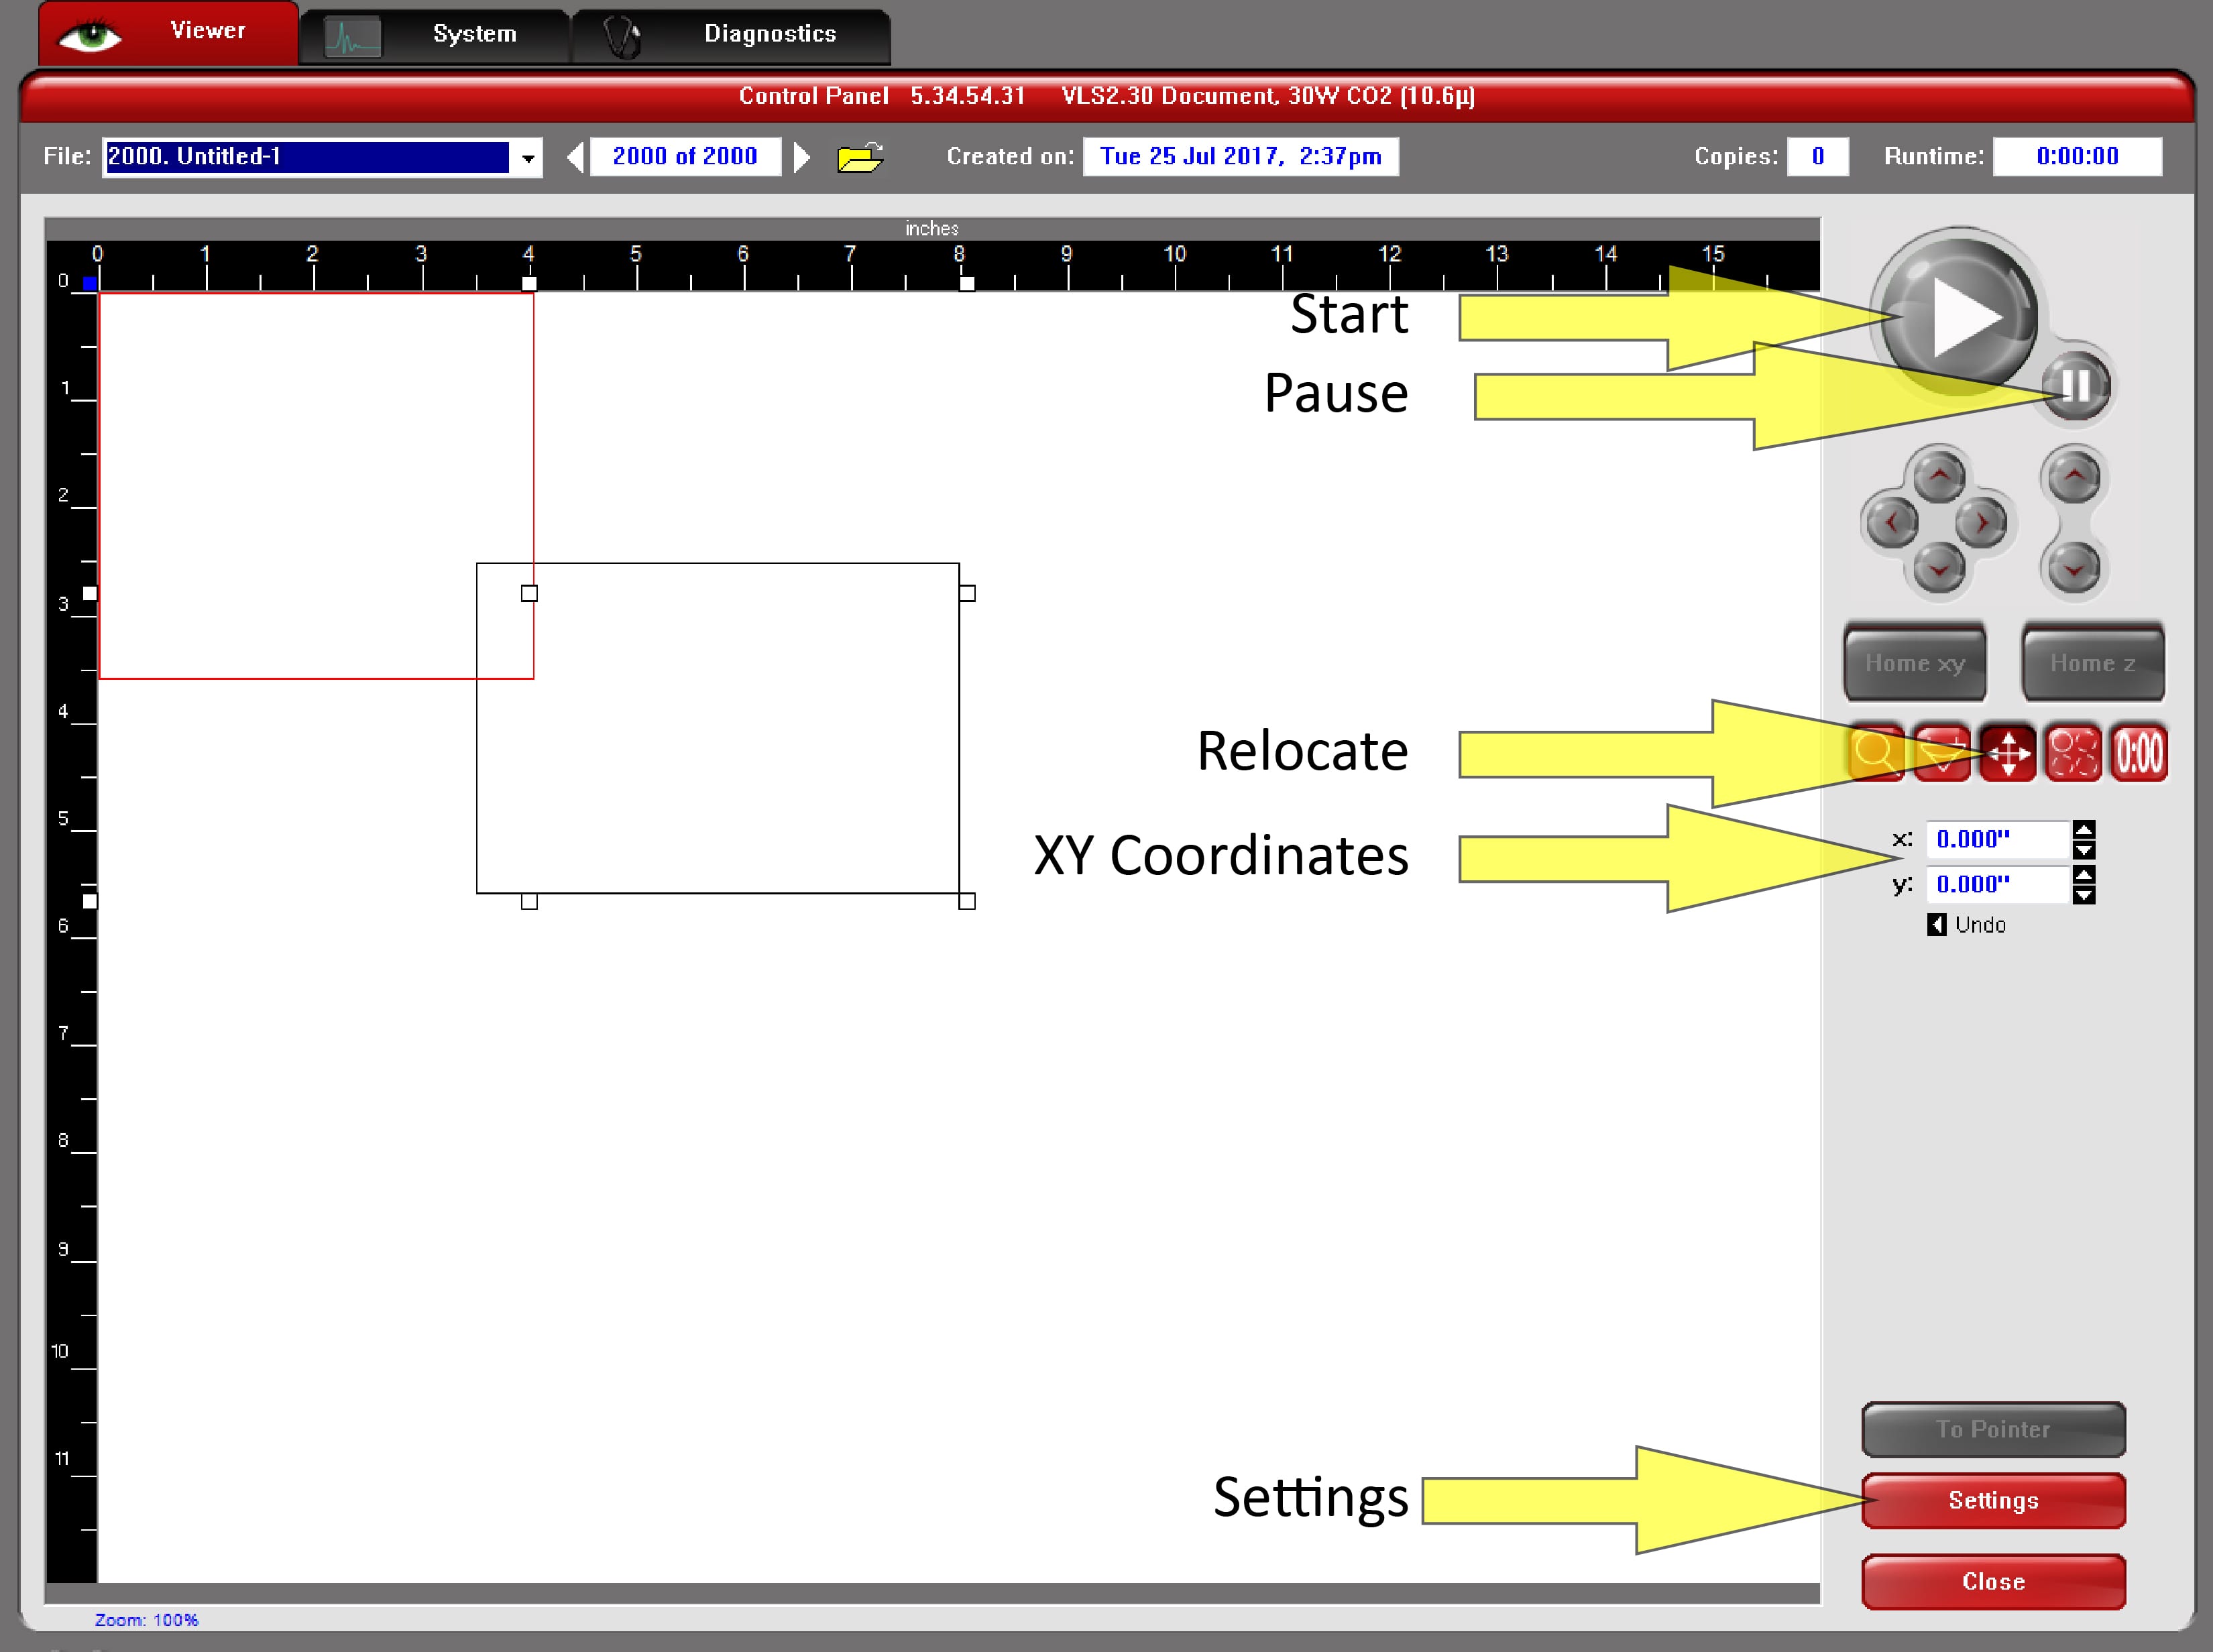
- Your Artwork should be in the upper left corner of the main Viewer Window.
- If not, Click (RELOCATE) and Zero (0.000) the XY COORDINATES to the upper left corner of artwork.
- When artwork is positioned correctly Click (SETTINGS)`
UCP SETTINGS
UCP Settings:
Skip Unused Colors
- Click on all colors NOT used in your cut file
- Select SKIP from the Mode drop down menu
- Press SET button
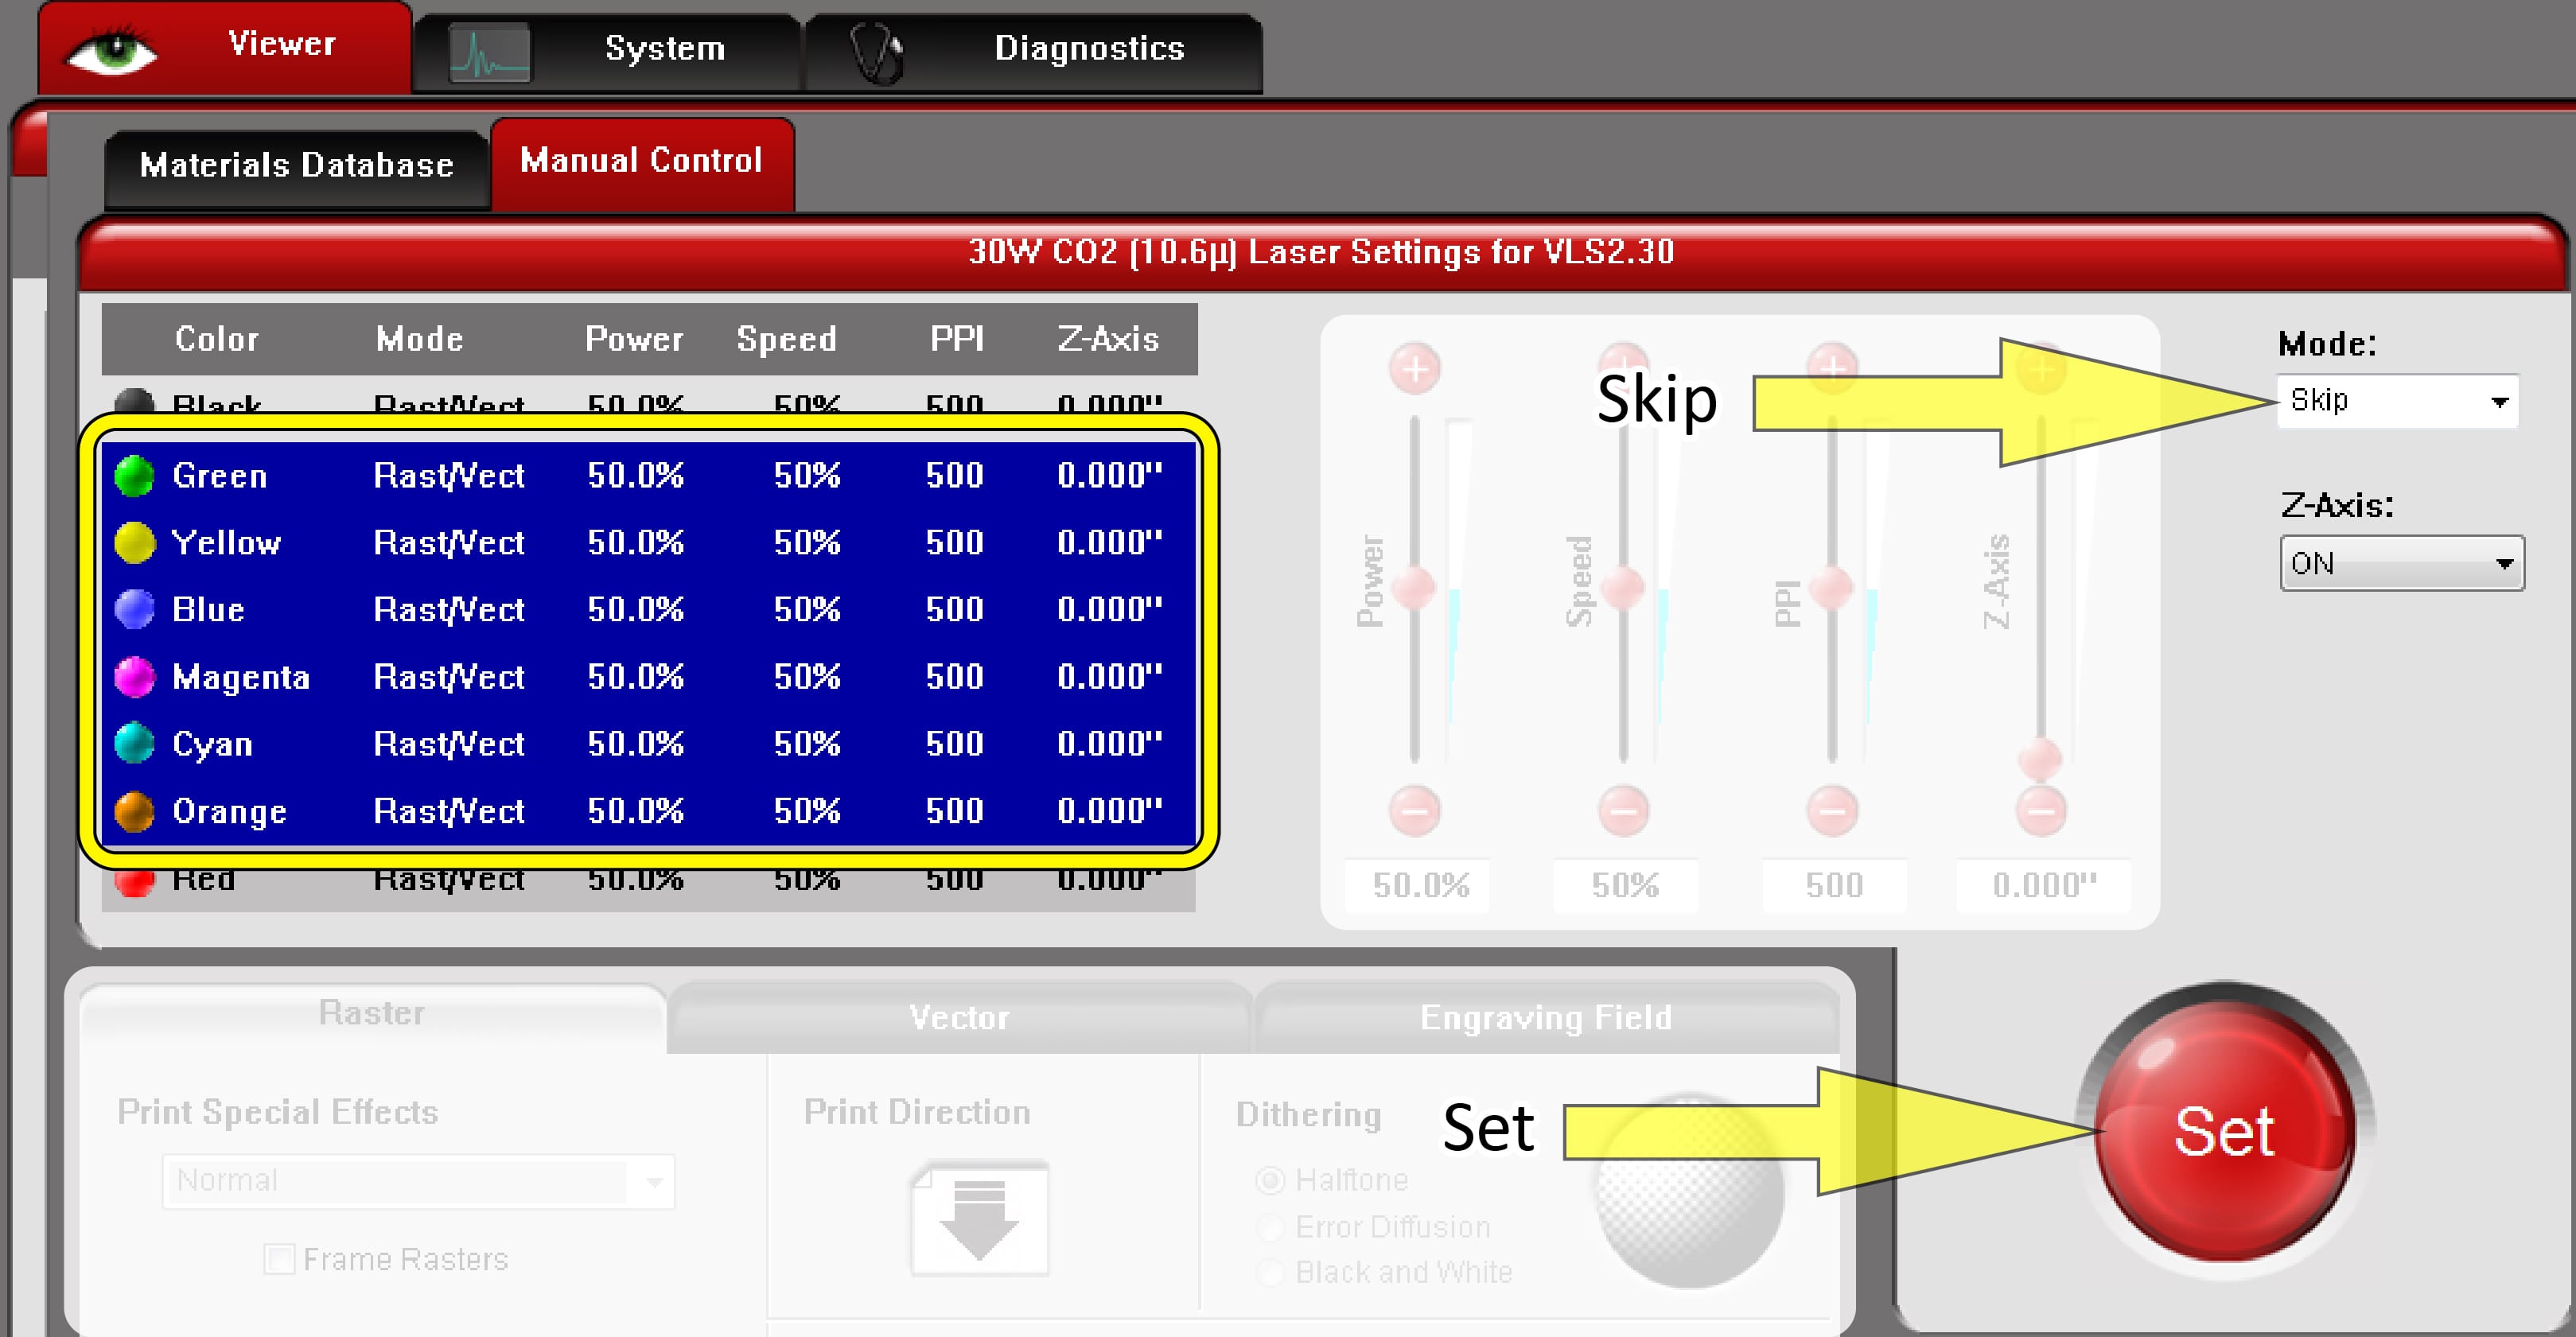
Specific Color Settings: depending on material type, thickness and desired outcome (Cut, Etch or Score)
- Click on color present in your cut file
- Select RAST/VECT from the Mode drop down menu
- Enter values for the 4 settings (Power, Speed, PPI (Pulses Per Inch) & Z-Axis (Thickness of material to be cut)
- Press SET button (If you don’t click SET after each color the values you enter will be lost)
- After settings for all colors are complete Press OK button

Start Cut Job
- Place Material to be cut in upper left corner on the laser cut table. (Use the rulers as a guide to keep material straight.
- Make Sure the Laser Exhaust System is turned ON!!! (see images below)
- Laser Exhaust Switch is located outside of the Laser Lab in the room with the Paint booth.
- Press the HAND ON button